by Jen. H.
First of all, get to know your camera! Now I for one do not read manuals, ever. It is a very bad habit. You hand me a gadget and I will figure out how to use it through trial and error, but that is not necessarily the best way. If you have patience it is really worth taking the time to read through the manual and understand all the options that your camera offers. I am still discovering new things my camera can do almost every time I use it and I’ve had the same camera for four years!
What are all these settings? And which ones should I use?
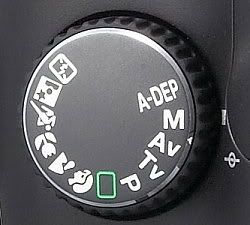
If you are using a digital SLR you’ll notice that there are many settings for your camera and we’ll concentrate on a few that most cameras have.
P – Program. This setting is very similar to a point and shoot, however you can control the depth of field (DOF) and the focal point.
Tv/S – Depending on your camera the shutter speed priority button may be labeled either Tv(Canon) or S(Nikon/Sony). This setting allows you to select the shutter speed, but automatically adjusts for the most favorable aperture, DOF, and focal point.
Av/A – Denotes the aperture priority button. You can select a given aperture and your camera will automatically adjust to the most favorable DOF, focal point, and shutter speed.
M –Manual. You have full control over all the options on your camera, shutter speed, aperture, and DOF. If you desire you can over expose and under expose your photos in this setting.
Determining which setting to use depends on your subject, the lighting, and many other things that I will discuss below to better guide you in choosing your settings.
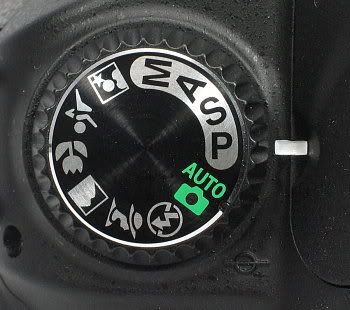
What about the “auto” setting??
Some of the best photos are accidental point and shoot photos, which is what the auto setting turns your expensive SLR into. If you are simply wanted to snap a couple photos with disregard for composition, or lack of time to anticipate adjusting the camera settings for the situation I suggest this setting. Don’t get me wrong… you can still take great photos this way, but you may be able to take BETTER photos if you utilize the other settings.
Aperture
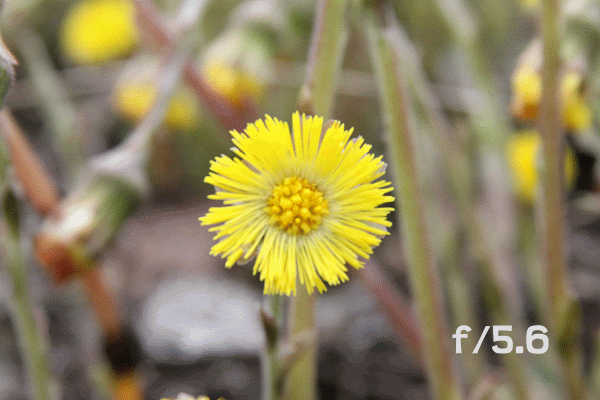
Aperture is also known as “F-stops” (for example: f3.5 or f/3.5). Think of a camera’s aperture like the pupil in an eye. A pupil constricts and gets smaller when there is a lot of light to view things correctly and dilates when there is less light. Your camera works in the same way. The larger the aperture opening (ie: the more light that is allowed into a camera) the lower the f-stop number is and the higher the aperture setting the smaller the hole is.
Just like your eye, when you are trying to read something close up your eye dilates and everything in the peripheral is out of focus. The aperture of the camera works the same. If it is open (low number) your subject will be in focus, but other objects further or closer may not. Low aperture settings are not as ideal for landscape settings or when you are far from a subject where you may want the entire photograph to be in equal focus. Instead you would want the aperture relatively high. Remember that when the aperture setting is high the opening in the lens is very small so you need more light or a longer shutter speed to allow enough light into the camera to properly expose the image.
Shutter Speed
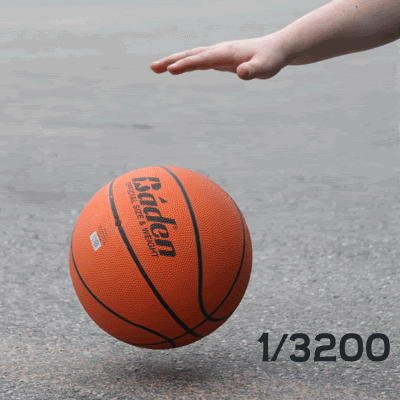
The shutter speed is essentially how long the shutter of the camera stays open to take a picture. The numbers are in fractions of a second. So a shutter speed of 2000 allows the shutter to open only for 1/2000th of a second. The faster your subject is moving (for example a moving car, athlete, or animal) the higher you’d want your shutter speed to be. A slow shutter speed and a fast moving object equals blurriness.
Remember, if you desire a fast shutter speed you have to have a lot of light to correctly expose your photo. If your shutter is only open for 1/2000th of a second the environment has to provide enough light to properly expose your image (like outside on a nice sunny day!)
Pro-Tip: When using a camera free hand without a tripod never set your shutter speed below 1/60th of a second. That is the slowest your shutter speed can operate and not be affect by the jerky movements of human hands. Set it any lower than that and you’ll have a blurry image!
Aperture versus Shutter Speed:
The relationship between aperture and shutter speed is as follows; if you desire a higher aperture (smaller opening) you will be constricting the amount of light allowed into the camera so the shutter will have to remain open longer to properly expose the image, but if you set your aperture low (larger opening) you will allow more light into your camera in less time so the shutter speed can be much faster.
Depth of Field (DOF) - Also known as the "A-DEP" setting.
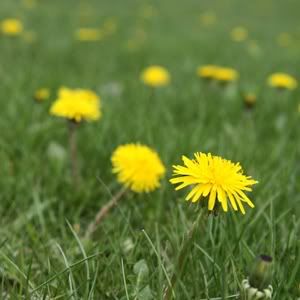
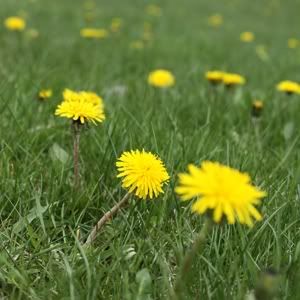
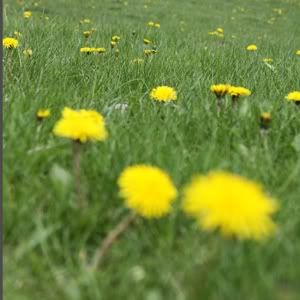
Depth of Field is a term used to describe the part of an image that is sharp and in focus. It is a gradual transition from sharp and in focus to out of focus and blurry. This is chiefly determined by your distance from the subject and aperture setting. The closer you are to a subject and the larger your aperture diameter (smaller the number) the smaller the depth of field will be, ie: there will be a smaller area in sharp focus.
ISO
ISO Stands for International Organization for Standardization. Your ISO setting determines just how sensitive your camera’s sensors are to light. The higher the ISO setting the more sensitive the sensors are. This means that you can change how much light your camera detects.
Why is that important? If you are in a low light setting where you would like to capture moving objects or don’t have a tripod you can change your ISO setting so your camera detects more of the light, allowing you to use faster shutter speeds and capture brighter images.
It is very important to note that while a higher ISO allows you to take photographs in darker situations it also produces very grainy photos. The lower ISO setting the more crisp the image will be.
Focusing
I will be completely honest. Many, if not a good majority, of my photos are taken using the autofocus setting. It works wonderful most of the time. When the lighting is low the autofocus on your camera may have difficulty focusing appropriately. If that is the case you may want to switch to manual focus.
When doing macro, close-up shots, or taking photos where I deliberately want part of the background out of focus the manual setting is what I utilize. It gives you the greatest control over your image and allows you to make sure that the subject is clear.
Was this information helpful? Do you have other questions?
Please leave a comment below.
Was this information helpful? Do you have other questions?
Please leave a comment below.
this info was VERY helpful. Now I just need to digest it all and make sense of it. Oh and practice to see what my camera will do. THANKS!
ReplyDeleteHi
ReplyDeleteI meant to comment on this ages ago!
This is a really cool guide. I'm currently teaching the missus photography and having these illustrations pre-made is useful.
Do you mind if I link to this page from the photography section on my site?
Thanks
Andy
P.S. I subscribe to your RSS and love getting those photo of the day posts!
Andy... you can absolutely link to this as long as you credit myself and the website here. :) Glad its so helpful! A lot of work went in to making sure all this wasn't confusing.
ReplyDeleteHey, I really like your demos on this page, they sum up the setting really well. I'm gonna link you.
ReplyDeleteawesome description and good examples
ReplyDeleteFirst I'd like to say I love your photos. My question is what software do you use to make your prints hdr? I have also found your abc's of photography helpful. Thanks!
ReplyDeleteOh wow...am bookmarking this....wow..thank you so much this is amazing!!!! Sarah
ReplyDeleteI just LOVE these tutorials...very helpful! It can all be SO confusing, seems every term/setting has at least two names.
ReplyDeleteI have a Canon Rebel XT, have been looking for a book that explains everything in a very simple, easy to understand, non-techy way. Any suggestions?
Hi! I just found you....your pictures are just beautiful. I would love to know what camera you use and what macro lens you use. I have been to Vermont two times and fell in love with it. Can't wait to go back again. Peggy
ReplyDeleteTHis is a great page of info!! THANKS!
ReplyDeleteJust commented on your pet entry for I Heart Faces ... I had to check out this page ... great information .. I'm bookmarking it, as well!! Thanks so much for sharing! I'm still getting acquainted with the settings on my Canon 30D ... hoping to upgrade soon!
ReplyDeleteI just upgraded my Canon to the T1i. Your tips were very helpful as I learn to navigate. It's hard t find explanations which are in plain language - so thanks. I can see I have a lot of practicing to do. I'll let you know how it turns out!
ReplyDelete